Posted on Leave a comment

Looking for an Enhanced Media Library alternative?

Enhanced Media Library Pro doesn’t support WordPress 5.3 and up. A good alternative is Media Library Categories Premium. All your categories and assignments can be migrated.

How to migrate from Enhanced Media Library (Pro)?

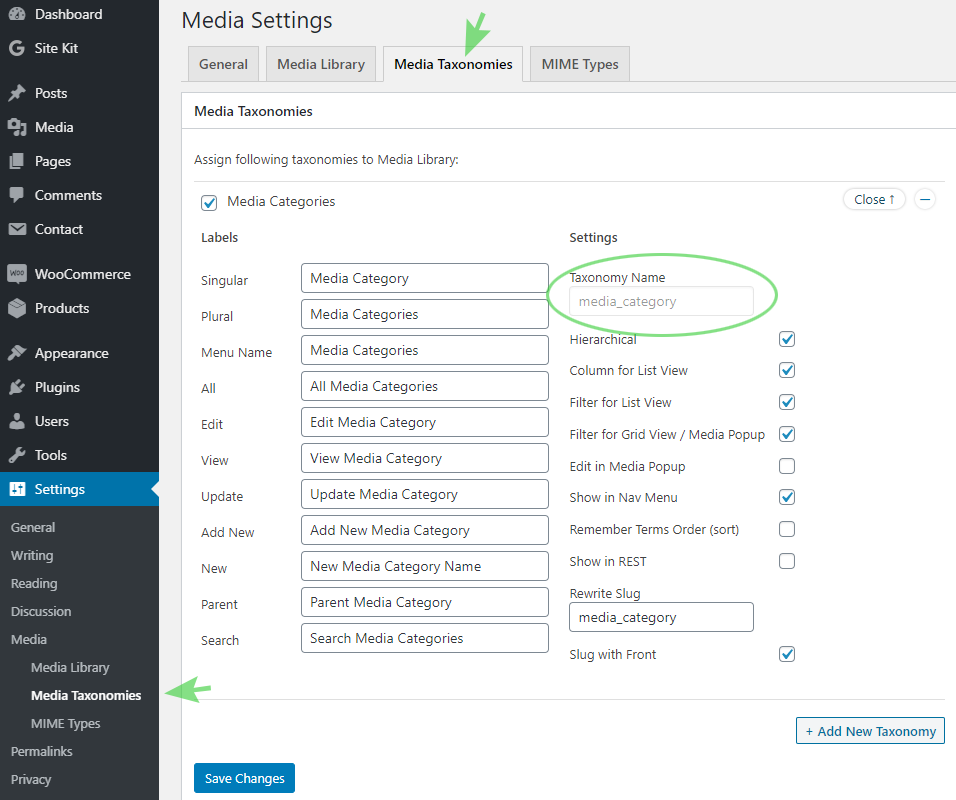
  1. Get the custom taxonomy from EML. Go to Settings → Media → Media Taxonomies. Look for the field Taxonomy Name the default value is media_category.
  2. Install and activate Media Library Categories Premium.
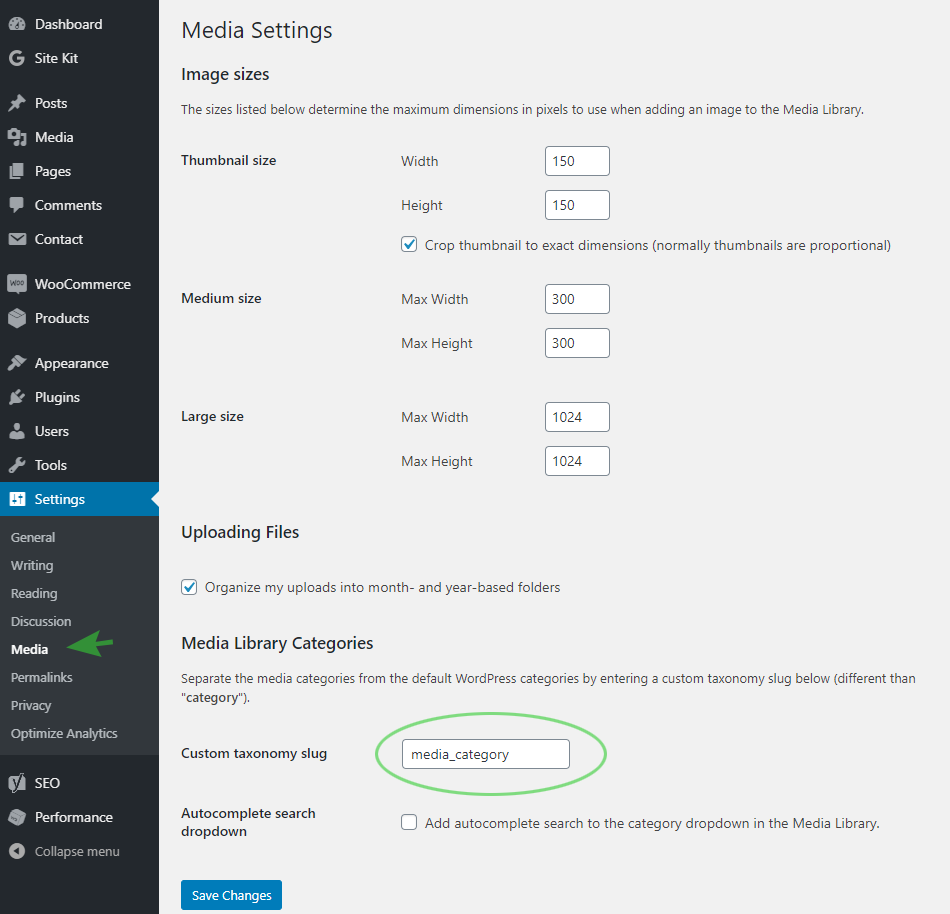
  3. In Media Library Categories Premium separate the media categories from the default WordPress categories through an user interface located under Settings → Media. In the field ‘Custom taxonomy slug’ add the same taxony name as used in Enhanced Media Library and save the changes.
  4. Disable (and remove) Enhanced Media Library (Pro).

Try Media Library Categories Premium – 100% money back guarantee.

Posted on Leave a comment

How to set a default category in WordPress

Categories are a type of taxonomy that WordPress uses to help users organize posts or organize media. By default WordPress assigns new posts to the category “Uncategorized”,  but you can also manually select another category before you publish anything new. It’s a small extra step that can easily lead to a majorly disorganized site if you frequently forget it. In this quick guide, we’ll show you how to change your WordPress default category from uncategorized to something custom! It’s pretty simple, so let’s get started:

Change the default category in WordPress in 5 steps

  1. Log in to your WordPress dashboard.
  2. In the WordPress admin select “Posts” >”Categories” from your left side bar menu.
  3. Add a new category that you would like to make your default category, for example ” Genereal”.
  4. Select “Writing” > “Settings” from the left hand side bar menu.
  5. Change the Default Post Category from “Uncategorized” to “General” using the drop down menu. (General is the new category you created in step 3.)
  6. Click “Save Changes”! Your new posts will automatically be set to publish under your new category “General”. 

Changing Your Default Category in WordPress Isn’t Too Hard

When you follow the above steps that we outlined, you’ll be able to set your default category to a much broader, customized selection instead of the standard “Uncategorized” in WordPress. Why does this matter? Having a tight, strategic plan for moving users through your WordPress website—even through page tags—can only improve user satisfaction and it’s crawl-ability. These are both essential elements to succeeding as a website today!

Posted on Leave a comment

How to change WordPress image compression

By default WordPress compresses the uploaded JPEG images and JPG images to 85%. Before WordPress 4.5 uploaded JPEG images were compressed to 90%. The compression was further increased to improve site performance for mobile users. WordPress will not compress the original uploaded image, only the generated images like large, medium, thumbnail and custom sizes.

If you want full image quality on your website (because for example you are a photographer) you want to turn off image compression in WordPress.

How to disable image compression in WordPress

You have to paste the following code in your theme’s functions.php file or in a site-specific plugin.
add_filter( 'jpeg_quality', function( $arg ) { return 100; } );
When you set the value to 100, it means that WordPress will keep the image at its highest quality.

How to increase image compression in WordPress

Compressing your images more than the default will boost your site’s speed and performance because the images will have a smaller file size. Most people will not notice the quality difference between 90% or 75%, but it will save you some extra bandwith and loading time.
add_filter( 'jpeg_quality', function( $arg ) { return 75; } );

After changing the compression ratio of your images it will only be applied to newly uploaded images. If you also want it to be applied to existing images you have to regenerate the thumbnails.

Posted on Leave a comment

How to add caption to images in WordPress

WordPress has a builtin functionality that allows you to easily add captions for images. Captions are a good way to display extra information about the image or show copyright information. After you upload an image, WordPress media uploader allows you to provide image title, description, and caption. You can also add captions to existing images by editing the image.

WordPress caption example
This is a caption example

Caption through shortcode

There is also a way to do it with a shortcode:
<image> Caption
For a full documentation of the caption shortcode read https://codex.wordpress.org/Caption_Shortcode

Posted on Leave a comment

Difference between WordPress categories, taxonomies and tags

Categories, tags, taxonomies and terms are all related in WordPress. But whats the difference?

WordPress taxonomies

The default taxonomies in WordPress are:

  • Categories: a hierarchical taxonomy that organizes content in the post Post Type.
  • Tags: a non-hierarchical taxonomy that organizes content in the post Post Type.
  • Post formats: a method for creating formats for your posts.
  • Custom taxonomies: created by a plugin or theme.

Every category and tag is actually a taxonomy. The big difference is that categories are hierarchical and tags are non-hierarchical.

In short: a taxonomy is a way to group things together.

Terms

Terms are items within a taxonomy. For example, if you have the taxonomy (category) Animal you would have the terms cat, dog and bird.

Categories in the WordPress media library

By default WordPress has no support for categories in the media library. Luckily there is a plugin that creates categories in the WordPress Media library.